Difference between revisions of "IRC"
(paid for/ recieved and added missing pictures for the instructions) |
|||
| Line 7: | Line 7: | ||
Once installed you should run the software and do the following. | Once installed you should run the software and do the following. | ||
| − | http:// | + | http://i37.photobucket.com/albums/e65/MessoFortis/HBW/mirc1.png |
Fill in the appropriate information | Fill in the appropriate information | ||
| Line 13: | Line 13: | ||
| − | http:// | + | http://i37.photobucket.com/albums/e65/MessoFortis/HBW/mirc2.png |
Click "servers" in the column to the left and you should see "Add" "Edit" & "Delete". Click "Add" and put in the information you see above and click "Ok" and then click the "Connect to server" button | Click "servers" in the column to the left and you should see "Add" "Edit" & "Delete". Click "Add" and put in the information you see above and click "Ok" and then click the "Connect to server" button | ||
| Line 37: | Line 37: | ||
It initiates a string of commands when you connect to a server, so here is a brief guide to it. | It initiates a string of commands when you connect to a server, so here is a brief guide to it. | ||
| − | Click this icon on the top menu http:// | + | Click this icon on the top menu http://i37.photobucket.com/albums/e65/MessoFortis/HBW/mirc4.png |
This will bring up this menu | This will bring up this menu | ||
| − | http:// | + | http://i37.photobucket.com/albums/e65/MessoFortis/HBW/mirc5.png |
Click the "Options" menu and then check the checkboxes like I have, this is the most common way and should be suitable for most users. | Click the "Options" menu and then check the checkboxes like I have, this is the most common way and should be suitable for most users. | ||
| Line 47: | Line 47: | ||
This will bring up this window, fill it in similarly to me, however replace "Your Nick" with the nickname you registered and replace "Password" with the password you registered. | This will bring up this window, fill it in similarly to me, however replace "Your Nick" with the nickname you registered and replace "Password" with the password you registered. | ||
| − | http:// | + | http://i37.photobucket.com/albums/e65/MessoFortis/HBW/mirc6.png |
Revision as of 21:15, 27 April 2007
Information from ID 13818
New to Hobowars is IRC Chat. Here I will discuss how to get started with IRC
Download mIRC from here and install it.
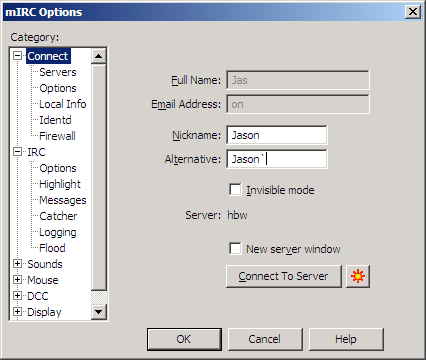
Once installed you should run the software and do the following.

Fill in the appropriate information

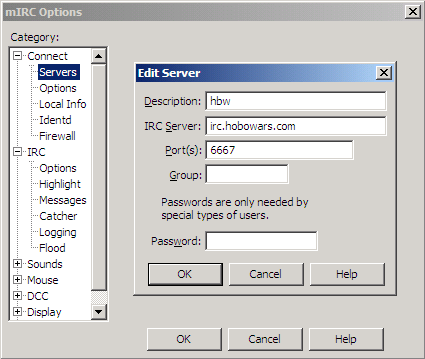
Click "servers" in the column to the left and you should see "Add" "Edit" & "Delete". Click "Add" and put in the information you see above and click "Ok" and then click the "Connect to server" button
Hey presto! You're all connected to IRC.
I bet you're wondering "Where's the chat" well, IRC supports multiple channels & IM so in order to join a channel you need to type in: /join #"channel" replacing "channel" with whatever channel you wish to join. eg: /join #Hobowars will make you join the Hobowars channel.
Also - You should change your nickname on the server using the following command: /nick "New nick"
Nickname registration:
/msg nickserv register "Password" "Email Address"
- This command will register your current nickname. So choose carefully! Also, change "Password" and "Email Address" to the appropriate information
That's pretty much it to cover the basics, however, mIRC has a useful tool called "Perform".
It initiates a string of commands when you connect to a server, so here is a brief guide to it.
Click this icon on the top menu 
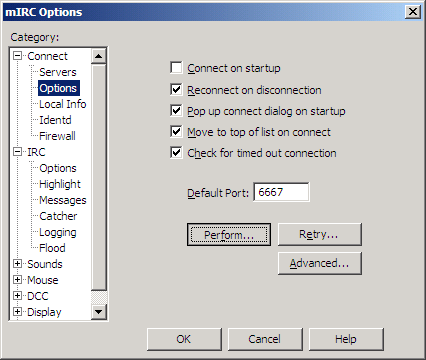
This will bring up this menu

Click the "Options" menu and then check the checkboxes like I have, this is the most common way and should be suitable for most users. Then click the "Perform" button.
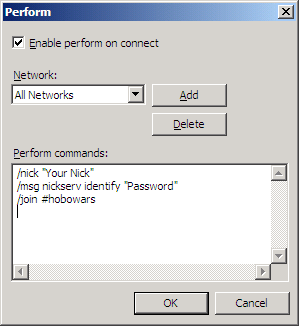
This will bring up this window, fill it in similarly to me, however replace "Your Nick" with the nickname you registered and replace "Password" with the password you registered.

Don't forget to check "Enable perform on connect"
You may also add /join #"Gangs Channel" replacing "Gangs Channel" with your gangs channel name to join their channel to your perform. eg: mine has /join #Slugabed
I think that covers it all.
Good luck, I look forward to seeing you on IRC
PS. I don't know how useful you will find this so comment and I'll update things as people see fit.
Questions
Q. Do you have to pay for mIRC?
- A. No
Commands
- /list lists all of the channels without mode +s
- /whois will give you various information about a chat user, their hostmask, the channels they are in, their idle time, which server they are connected to, whether they are away or not & if they are network administrators.
- /me is the "action" command. eg:- "/me bounces" would display as * Jason bounces
- /msg "nick" will send a private message to someone. This can also be achieved by double clicking someones nick.
- /nick "newnick" as mentioned above will change your nick to "newnick"
- /away "Reason" will set you to away status and whenever anyone sends you a private message it will notice them with your reason.
- /join #channel will make you join the channel specified
- /part #channel will make you part the channel specified
- /quit "Reason" will make you disconnect from the server with "reason" being displayed.
- /ping "nick" will ping the specified nick
- /notice "nick" followed by a message will send a message that only the specified nick can see. This isn't to be confused with a private message, though they are quite alike.
- /hop will make you leave and rejoin whatever channel you typed it in. There aren't very many uses for it, I suppose if your parents are watching you, and you see someone type something you don't want them to see, you could /hop and clear the channel.